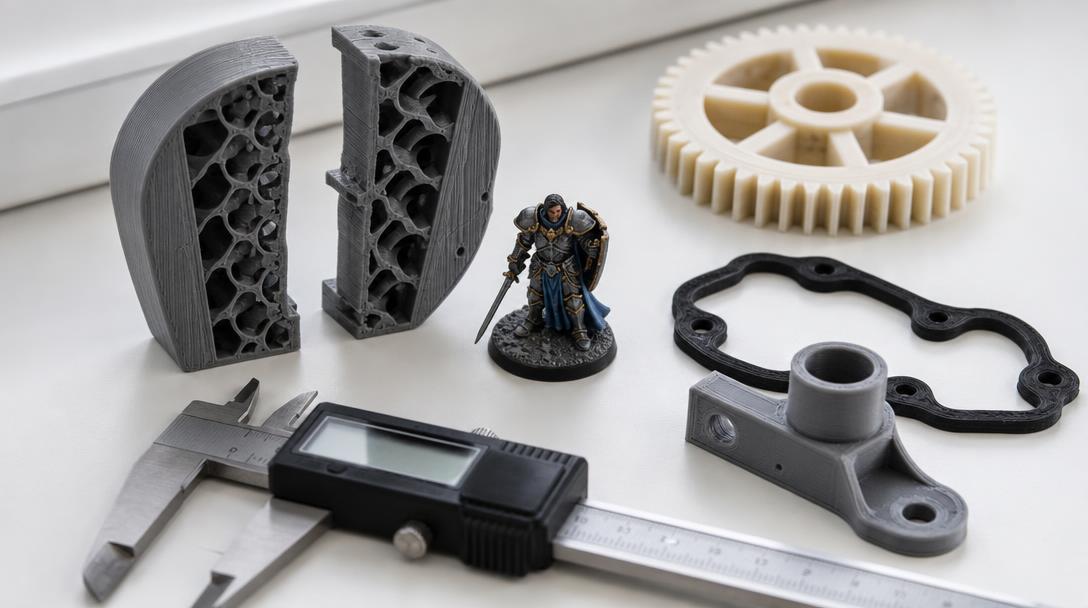
Which 3D Printing Settings Should You Use for Each Part?
Five settings determine how strong, detailed, and costly a 3D-printed part will be: wall count, infill, layer height, nozzle diameter, and material. The most common mistake is increasing infill to improve strength; in reality, wall count and print orientation matter most. This guide gives recommended settings for 10 examples, from figurines and gears to gaskets and outdoor parts, plus a quick decision table.
Start with one question: What will the part do?
Choose settings based on the part’s purpose:
- Primarily decorative (figurine, model, gift): detail and surface finish matter → fine layers, few walls, low infill.
- Load-bearing (bracket, gear, hinge): strength matters → more walls, medium-to-high infill, suitable material and orientation.
- Flexible (gasket, bumper, cover): flexibility matters → TPU, low infill.
- Exposed to heat or sunlight (inside a vehicle, balcony, outdoors): use a material resistant to heat and UV.
- Just a test (checking dimensions, first prototype): speed and cost matter → thicker layers, few walls.
Five settings, briefly explained
Wall count (perimeters): The number of lines forming the part’s outer shell. With a 0.4 mm nozzle, each wall adds about 0.4–0.45 mm of thickness. This setting has the greatest effect on strength. Breaks often start at the shell; increasing from 2 to 4 walls usually adds more strength and uses less material than raising infill from 20% to 50%.
Infill: The pattern filling the inside of the part. 10–20% is enough for decorative parts; 40–60% is for load-bearing parts. 100% is worthwhile only for small, heavily stressed parts. Gyroid gives balanced strength in every direction. Grid/cubic patterns print quickly. Honeycomb is strong but slower to print.
Layer height: The height of each layer. Fine layers (0.08–0.12 mm) give a smooth surface and fine detail, but can make printing take 2–3 times longer. Thick layers (0.24–0.28 mm) are faster, with more visible layer lines. 0.20 mm is a balanced standard for most jobs.
Rule: Layer height can be no more than 75% of the nozzle diameter. With a 0.4 mm nozzle, the upper limit is about 0.30 mm; with a 0.2 mm nozzle, 0.15 mm; with a 0.6 mm nozzle, 0.45 mm; and with a 1.0 mm nozzle, 0.75 mm.
Nozzle diameter: The width of the tip through which plastic is extruded.
- 0.2 mm: For miniatures and very fine detail. Very slow; thin features can be fragile.
- 0.4 mm: Standard. The best balance between detail and speed.
- 0.6 mm: For large, strong parts. Walls are thicker and printing is faster.
- 0.8–1.0 mm: For very large, coarse parts, thick-walled vases, and fast large prototypes. Detail decreases while strength and speed increase.
At Ucuz3D, printing is available with nozzles from 0.2 mm to 1.0 mm; we can choose the right one together for your part.
Material: Plastics differ in heat, impact, flexibility, and UV resistance. See the summary table below.
Material selection: quick table
| Material | Strength | Weakness | Approx. heat limit* | Typical use |
|---|---|---|---|---|
| PLA | Easy to print, detailed, inexpensive | Softens in heat, brittle | ~55 °C | Figurines, models, prototypes, décor |
| PETG | Tough, resistant to moisture and chemicals | Surface is less crisp than PLA | ~70 °C | Enclosures, fixtures, everyday use |
| ABS | Heat-resistant, can be sanded | Prone to warping | ~90 °C | Vehicle-interior parts, enclosures |
| ASA | Like ABS, plus UV-resistant | Prone to warping | ~95 °C | Outdoors, balconies, vehicle exterior |
| TPU (95A) | Flexible, absorbs impacts | Prints slowly; fine detail is difficult | ~60 °C | Gaskets, bumpers, covers, feet |
| Nylon (PA) | Highly resistant to wear and impact | Absorbs moisture; needs drying | ~80–100 °C | Gears, hinges, sliding parts |
| Carbon-fiber reinforced (PLA-CF, PETG-CF, PA-CF) | Rigid, dimensionally stable, matte finish | More brittle, abrasive | Depends on material | Brackets, fixtures, drone frames |
| PC / PC-ABS | High heat and impact resistance | Difficult to print | ~110 °C+ | Technical parts exposed to heat |
*Approximate temperature at which the material begins to soften under load; varies by material and settings.
Recommended settings by use (10 examples)
1. Desktop figurine / miniature (3–8 cm)
- Nozzle: 0.2 mm is ideal. It can also be printed with 0.4 mm, but facial and finger details will be softer.
- Layer: 0.08–0.12 mm
- Walls: 2 (3 with a 0.2 nozzle)
- Infill: 10–15%. A figurine’s strength comes from its shell.
- Material: PLA. Matte PLA hides layer lines better; silk PLA has a glossy appearance.
- Supports: Tree supports. They leave fewer marks and are easy to remove.
- Tip: With a 0.2 mm nozzle and 0.08 mm layers, facial features and small accessories can come out very clearly in FDM. For miniatures under 3 cm with extremely fine details (such as a thin sword or hair strands), contact our adviser first; we can assess which details can be printed robustly with FDM.
2. Large figurine, bust, cosplay / costume piece (15 cm and above)
- Nozzle: 0.4 mm (0.6–0.8 mm for parts over 50 cm; print time is halved)
- Layer: 0.16–0.20 mm. If painting and priming, 0.20–0.24 mm is enough; sanding removes the layer lines.
- Walls: 3
- Infill: 10%, gyroid
- Material: PLA. Use PETG if it will be worn and take impacts.
- Tip: Splitting a large figurine into sections and joining them with pins or a lock reduces supports and improves the surface.
3. Mechanical bracket, connector, hanger
- Nozzle: 0.4 mm (0.6 mm is stronger for a large bracket)
- Layer: 0.20 mm
- Walls: 4–6
- Infill: 40–60%, gyroid
- Material: PETG (general use), ASA (outdoors/heat), PA-CF or PETG-CF (rigidity)
- Most critical: print orientation. FDM parts are weakest along the layer direction. The load should not pull the layers apart. Printing an L-shaped bracket on its side can make it many times stronger than printing it upright.
4. Gear, pulley, sliding part
- Layer: 0.12–0.16 mm. Tooth profiles come out more accurately.
- Walls: 4 or more; teeth are usually made entirely of walls.
- Infill: 50–100%
- Material: Nylon (PA) or PA-CF is best. PETG is sufficient for light loads. A PLA gear wears quickly.
5. Screw boss, nut pocket, metal insert (heat-set)
- Use at least 4 walls around the hole, or 2–3 mm of wall thickness around it.
- If it will be frequently assembled and disassembled, fasten the screw into a heat-set brass insert, not directly into the plastic.
- Model holes 0.2–0.3 mm larger than the target size; FDM holes tend to print slightly undersized.
6. Flexible part: gasket, bumper, protective cover, foot
- Material: TPU 95A
- Walls: 2–3
- Infill: 10–30%. Infill determines flexibility: low infill feels soft, high infill feels firm.
- Layer: 0.20 mm
- Tip: For parts that need to seal, such as gaskets, increase the wall count and keep the top and bottom layers thick.
7. Outdoors, balcony, garden
- Material: ASA (the most UV-resistant) or PETG. PLA can fade in sunlight within a few months and may deform in summer heat.
- Walls: 3–4, Infill: 25–40%
- For parts that collect water, make the top and bottom layers thick (5–6 layers).
8. Vehicle interior or heat-exposed part
- A parked vehicle interior can readily exceed 70 °C in summer → PLA and PETG are unsuitable.
- Material: ABS or ASA; PC if near the engine compartment.
- Walls: 4, Infill: 30–40%
9. Electronics box / enclosure
- Material: PETG (general), ABS (electronics that get hot)
- Walls: 3, Infill: 20%
- Layer: 0.20 mm
- Leave a 0.2–0.3 mm clearance where the lid and body fit together.
- For snap-fit lids, print the flexible arm of the clip parallel to the build plate (lying down); an upright clip can break along a layer line the first time it is fitted.
10. Rapid prototype / dimensional check
- Layer: 0.24–0.28 mm, Walls: 2, Infill: 10–15%
- Material: PLA
- The goal is only to answer “Will it work?” Thick layers noticeably shorten print time; fewer walls and lower infill reduce the grams used and therefore the cost. Once the dimensions are right, printing the final part with the intended settings is the most economical approach.
Bonus: Vase mode (single wall)
Decorative items such as vases, lampshades, or pencil holders can be printed with a single wall, no infill, and an open top (spiral/vase mode). It is very fast and gives an almost flawless surface. If the part needs to hold water or be sturdy, print a single thick wall (about 1 mm) with a 0.8–1.0 mm nozzle.
Quick decision table
| What are you printing? | Nozzle | Layer | Walls | Infill | Material |
|---|---|---|---|---|---|
| Small figurine, miniature | 0.2 | 0.08–0.12 | 2–3 | 10–15% | PLA (matte) |
| Large figurine, bust | 0.4 | 0.16–0.20 | 3 | 10% | PLA |
| Bracket, hanger | 0.4–0.6 | 0.20 | 4–6 | 40–60% | PETG, ASA, PA-CF |
| Gear | 0.4 | 0.12–0.16 | 4+ | 50–100% | Nylon, PA-CF |
| Gasket, bumper | 0.4 | 0.20 | 2–3 | 10–30% | TPU |
| Outdoors | 0.4 | 0.20 | 3–4 | 25–40% | ASA, PETG |
| Vehicle interior | 0.4 | 0.20 | 4 | 30–40% | ABS, ASA |
| Electronics enclosure | 0.4 | 0.20 | 3 | 20% | PETG, ABS |
| Prototype | 0.4 | 0.24–0.28 | 2 | 10–15% | PLA |
| Vase | 0.4–1.0 | 0.20–0.50 | 1 | 0% | PLA, PETG |
Common mistakes
- Assuming “100% infill = strongest.” In a large part, 100% infill multiplies weight and cost without increasing strength proportionally. Increase wall count first.
- Ignoring print orientation. The same part may be several times stronger when printed on its side rather than upright.
- Expecting detail finer than the nozzle. A 0.4 mm nozzle cannot print a wall thinner than 0.4 mm; very fine features must be thickened in the model or printed with a smaller nozzle.
- Using PLA in heat. PLA softens and deforms inside vehicles or in direct sunlight.
- Designing parts without clearance. Mating parts may not fit unless you leave 0.2–0.3 mm clearance.
These settings in the Ucuz3D calculator
On the 3D printing price calculator page, you can choose the wall count (2 / 3 / 4), layer height (0.12–0.28 mm), and infill (15–100%). Our model is sliced on the server with a real slicer; you can instantly see how your settings affect weight, time, and cost. The calculator uses a 0.4 mm nozzle; if you want a different nozzle (0.2–1.0 mm), just mention it in your note. If you are unsure, describe what the part needs to do in your note and an adviser will choose the settings for you.
More detailed guides
- How many walls (perimeters) should you use?
- What is infill, and what percentage should you choose?
- Choosing layer height: comparing 0.12, 0.20, and 0.28 mm
- How does print orientation affect part strength?
- Screw-boss design: insert, direct thread, or nut pocket?
- FDM tolerances: the right clearance for mating parts
- Which filament for outdoors: PLA, PETG, or ASA?
- Where are TPU and flexible filaments used?
Frequently asked questions
How many walls are enough for a figurine?
Two walls and 10–15% infill are enough for desk figurines. If the figurine may be dropped or handled like a toy, 3 walls are recommended.
For a mechanical part, should I increase infill or walls?
Increase walls first. 4–6 walls and around 40% infill usually provide a better strength-to-weight ratio than 100% infill.
What is the thinnest layer height?
With a 0.4 mm nozzle, 0.08–0.12 mm is a practical lower limit. For finer detail, use a 0.2 mm nozzle with 0.06–0.08 mm layers.
Does a greater layer height make the part weaker?
The difference in strength is usually small; the main differences are surface quality and print time. 0.20 mm is a good balance for mechanical parts. Print temperature and material have the greatest effect on layer adhesion.
Which material is strongest?
“Strongest” depends on the application. Nylon stands out for impact and wear, carbon-fiber-reinforced materials for rigidity, PC/ABS/ASA for heat, and TPU for flexibility.


 Türkçe
 العربية
 Русский
 فارسی
فارسی Deutsch