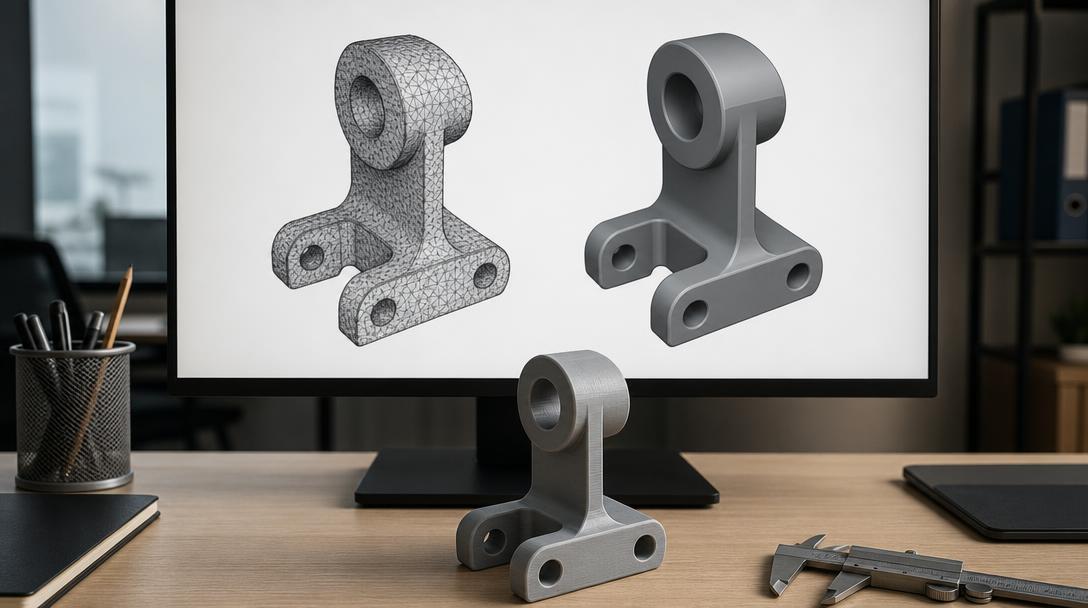
How do I convert STL to STEP and STEP to STL?
Converting STEP to STL is easy: open the model in your CAD program and choose STL under Export. STL can also be converted to STEP, but the result is a surface made of triangles, not a true parametric solid. If you need an editable STEP model, you will usually need to remodel the part.
What is the difference between STL and STEP?
STL describes a surface as many small triangles. It is widely used by 3D-printing software, but usually does not preserve the original dimensions, curves, or design history. STEP transfers design geometry between CAD systems and commonly carries B-rep surfaces and solid-body information. Holes, planes, and curves are represented differently from a triangular STL mesh.
In short, STEP-to-STL samples CAD geometry into triangles for printing. In the reverse direction, triangles can be placed in a STEP file, but the conversion cannot automatically recover lost design intent or parametric features. See our 3D-printing file formats guide for more context.
How to convert STEP to STL
The process is similar in most CAD applications:
- Open the STEP file and check that the model appears at the correct scale and position.
- Choose Export or Save As, then select STL. Menu labels vary by application.
- If asked for units, choose millimetres (mm). STL does not reliably store unit information, so a mismatch can make the model appear far too large or small in a slicer.
- Set the tessellation resolution or tolerance, then reopen the exported file in a viewer or slicer to inspect it.
Resolution controls how closely the triangles follow curved surfaces. A setting that is too coarse makes cylinders and curves visibly faceted. An excessively fine setting can create a huge file and longer processing time without a noticeable print benefit. The right setting depends on part size, curvature, and intended use: start with a reasonable default, inspect curved areas, and refine the setting if needed.
Do not rely only on the model appearing on screen. Check its dimensions, orientation, and surfaces in the slicer. If the scale is wrong, verify both export and import units. STL has no unit label, so identical coordinate values may be interpreted as millimetres or inches.
How to convert STL to STEP
In FreeCAD, the general workflow is to turn the STL triangle mesh into a shape, convert it to a solid where possible, and export it as STEP. Menu labels can differ by version or workbench:
- Import the STL and check its scale. Holes, intersecting triangles, or open edges may require repair first.
- In the mesh tools, use Create shape from mesh. Avoid unnecessarily tiny tolerance values, which can make dense meshes slow to process.
- Select the resulting shape and use the solid-conversion command. A refine step may be available, but it does not restore the original CAD features.
- Select the solid or shape and export it as STEP. Reopen the file and check the geometry and dimensions.
Not every mesh converts cleanly. An open or inconsistent mesh may fail to form a solid. A very high triangle count can make FreeCAD slow, consume memory, or appear unresponsive. A real curved surface is already split into flat triangles in an STL; exporting it as STEP does not automatically turn those facets into a perfect cylinder or parametric surface.
CAD tools such as Fusion also provide ways to convert mesh geometry to B-rep. The general idea is to select a mesh body and apply a conversion command, but the menu location, command name, and supported mesh density depend on the version, license, and workspace. Do not assume that older and newer interfaces use identical steps; check the help for your version. Dense meshes may need to be reduced first. The resulting geometry often contains many individual faces and can be cumbersome to edit.
Are online converters safe?
Web converters can be convenient for a quick test: upload the file and choose a target format. However, the model is sent to the provider’s server. If it contains a product prototype, customer part, unreleased design, or confidential dimensions, review the service’s privacy and retention terms before uploading. Use local CAD software when confidentiality matters.
Online tools may also limit mesh quality, file size, or supported features. A success message does not mean the model is sound or editable. Open the result locally and check scale, holes, surface orientation, and solid validity. If the STL mesh is damaged, start with our STL repair guide.
Which format should I send for 3D printing?
FDM 3D printing requires slicing the model into layers; STL or 3MF is sufficient for most jobs. If you have a STEP file, you do not have to convert it yourself: the 3D printing price calculator accepts STL, OBJ, 3MF, and STEP files and slices the file itself. The file still needs to have the correct scale and printable geometry.
If you only need a print, turning triangles into a complicated CAD body is usually unnecessary. If you need to change dimensions, add holes, or edit design features, ask for the source CAD file or original model instead. An STL-derived STEP file may help with compatibility in some workflows, but do not expect easy editing or design history.
Open the model in a viewer to check its entirety, orientation, and scale. For more preparation guidance, see the 3D printing service page.
Frequently asked questions
Can I edit a model freely after converting STL to STEP?
Usually not. The conversion creates surfaces from the triangle mesh; it does not restore the model’s original parametric features or design history. Remodeling may be the better option for meaningful CAD edits.
Why does STL-to-STEP conversion slow down my computer?
Each triangle can create a new geometric face. Dense meshes increase memory and processing demands; reducing or repairing the mesh first may help.
Should I send STEP or STL for 3D printing?
STL or 3MF is usually enough for printing. The calculator accepts STL, OBJ, 3MF, and STEP and slices the model itself; check dimensions and geometry before printing.



 Türkçe
 العربية
 Русский
 فارسی
فارسی Deutsch