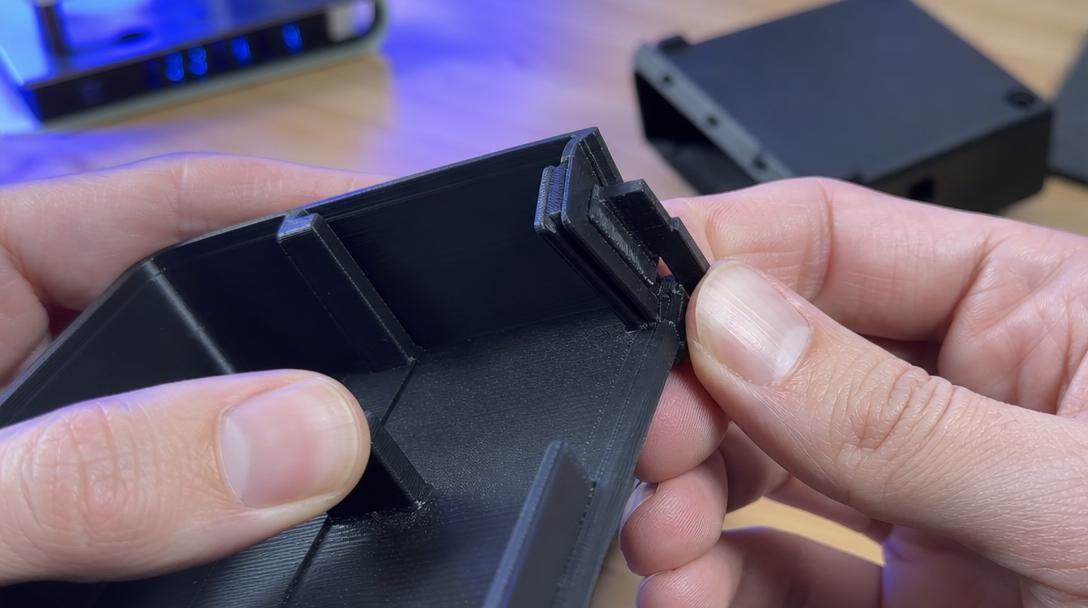
Snap-Fit Design: How to Draw Snap-Fit Clips That Don’t Break
Snap-fit design can work quite well in FDM printing when it is made with the right clearance, the right flex length, and the right print orientation. In most cases, the problem is not the clip concept itself; it is choosing a root that is too thick, an arm that is too short, or a tolerance that is too tight.
Especially in lids, enclosures, battery compartments, electronics boxes, and small service covers, snap-fit solutions reduce the need for screws, speed up assembly, and lower the number of parts. However, it is very common for a clip that works on screen to break immediately after printing. If you apply a few basic rules during the design stage, you can move from prototype to a working part more quickly. If your design is ready, producing a sample for functional testing with our 3d printing service helps reduce costly revisions later.
Why do snap-fit clips break?
In FDM parts, breakage usually comes from three causes: insufficient flex allowance, stress concentration at a sharp corner, and the wrong choice of layer orientation. When the clip arm is kept too short, the part is forced instead of flexing. If there is a sharp 90-degree transition at the root section, the load concentrates at a single point. And if the layers are positioned against the bending direction, a part that should flex in theory may separate along the layer line.
That is why, in snap-fit design, it is not enough to think only “it should snap into place”; you also need to answer these questions from the start: “How many times will it be attached and removed, how much will it flex, and how much force will the user apply?”
4 basic rules for a snap-fit design that doesn’t break
- Make the arm longer; do not thin the root: A longer clip arm makes the same movement with lower stress. Very short clips feel stiff and crack quickly.
- Add a radius to the root area: A small fillet where the clip connects to the body significantly reduces stress concentration.
- Do not reduce the snap clearance to zero: Clips that try to fit into the mating part with exactly zero tolerance will bind because of print tolerances. That is why you should leave controlled clearance in the test prototype.
- Soften the hook angle: Using a smoother slope on the entry side and a steeper surface on the exit side for retention makes assembly easier.
Although ideal values vary depending on the scale of the part, the safest approach in snap-fit work is to print small test coupons first. Especially in lidded box and electronics enclosure projects, validating a single clip first and then applying it to the whole product is more efficient. When calculating part size and revision count, seeing an instant price helps you manage the trial-and-error process in a more planned way.
Material choice and print orientation directly affect the result
Not every filament behaves the same way for snap-fit applications. PLA is rigid and gives fast results in prototyping; however, it can be brittle in clips that are opened and closed frequently. PETG behaves more toughly and often gives safer results in repeated use. For special solutions with a high need for flexibility, TPU can be considered; however, it may remain too soft for every clip geometry. For parts exposed to outdoor conditions or temperature fluctuations, ASA or engineering-grade materials may be a better choice.
Print orientation is at least as critical as the material. If the bending axis of the clip arm ends up in a direction where the layers separate easily, even a good material will not save you. For this reason, when determining print orientation, look not only at surface quality but also at the load path. If you want to clarify the logic of clearance in interlocking connections, the guide What Is Tolerance? How Should Interlocking Parts Be Designed? provides a good foundation on this topic.
What should you test in the first prototype?
In the first print, testing only the critical connection instead of the entire product saves time. It is enough to check these four points: does the clip require excessive force when inserted by hand, does it leave play when it snaps into place, does whitening or cracking occur during removal, and does its behavior change on the second and third insertion?
If the clip is too stiff in the first use, instead of changing the material immediately, it is usually better to first increase the arm length, enlarge the root radius, and slightly open the snap clearance. In most snap-fit problems, the solution is found in the geometry before the printer. A properly designed clip reduces the need for screws and additional hardware, helping you produce cleaner parts that assemble faster.


 Türkçe
 العربية
 Русский
 فارسی
فارسی Deutsch