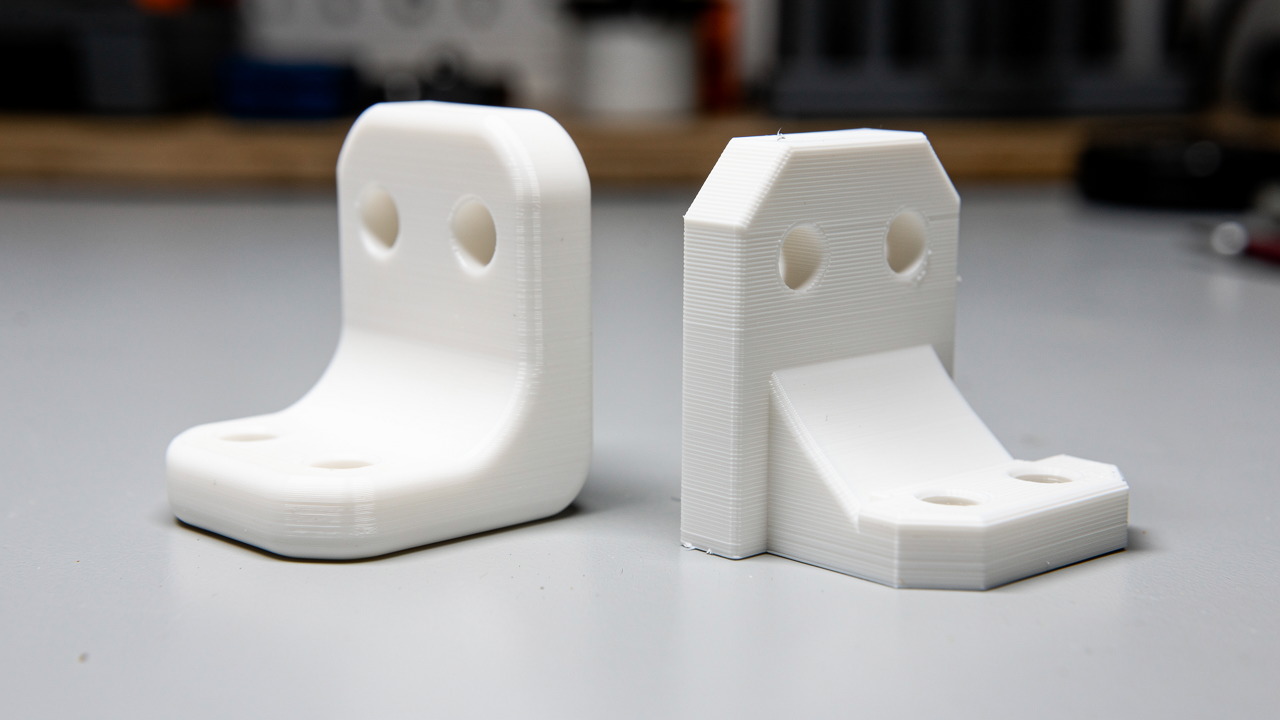
Fillet or Chamfer? Which Is the Better Choice for 3D Printed Parts
Fillet or chamfer? The short answer is this: in FDM parts, fillet is usually the safer choice for load-bearing corners and corners with a risk of crack initiation; chamfer is more practical in areas where you want to avoid supports, make assembly easier, or speed up printing. In other words, the right choice is influenced not only by aesthetics, but also by the part’s load direction, print orientation, and production time together.
At the design stage, this decision is more important than you might think. In 3D printing, corner geometry affects not only appearance, but also stress concentration, how the layers sit, support requirements, and later assembly. Especially when getting a 3d printing service for a functional part, even a small corner choice can affect both strength and cost.
When is fillet advantageous?
Fillet, meaning a rounded corner, reduces the sudden build-up of load at the corner. That is why it delivers safer results in parts exposed to impact, tightening and loosening, bending, or vibration. In areas such as handle bases, bracket connections, clip bases, and screw tabs, using a fillet instead of a sharp transition reduces the risk of cracking.
In FDM printing, interlayer strength is already direction-dependent. When a sharp internal corner is added to that, failure often starts exactly at that point. Fillet softens this transition and distributes the stress over a wider area. If your goal is a long-lasting prototype or functional part, fillet is generally the safer first choice.
When is chamfer more logical?
Chamfer, meaning a beveled edge, is a very powerful tool in terms of printability. Especially in FDM, inclined surfaces around 45 degrees require far less support than a flat overhang. For this reason, chamfer is usually more production-friendly on bed-contact edges, hole entrances, mating surfaces, and areas that need assembly guidance.
For example, using a small chamfer on the bottom edge of a part can make the elephant’s foot effect less visible. A short bevel at the entrance of a hole helps a bolt or shaft align with the part more easily. Also, when you create a controlled slope instead of a sharp vertical wall, print time and post-processing needs can be reduced as well. If you want to see how this design decision affects cost, uploading your file and getting an instant quote is the fastest way.
Which one is stronger?
It would not be correct to say “fillet is always stronger” on its own; however, from a structural point of view, fillet comes out ahead in most load-bearing transitions. That is because even though chamfer softens the corner, it does not distribute load flow as evenly as a rounded transition. In contrast, chamfer’s advantage is manufacturability: less support, cleaner printing, and easier assembly.
- Strength priority: Fillet
- Support-free printing priority: Chamfer
- Assembly alignment: Chamfer
- Impact and fatigue resistance: Fillet
- Fast and clean production: Chamfer
Practical selection rule
If a corner will work under load, think of fillet first. If an edge creates a risk of sagging during printing or the part needs to fit easily into place, think of chamfer. In many good designs, the two are used together: fillet in internal structural transitions, chamfer on outer entries and print-friendly edges.
At this point, it is necessary to look not only at the corner shape but also at wall thickness. In a thin-walled part, a large fillet can sometimes lead to more material build-up than expected; an overly aggressive chamfer can unnecessarily reduce the contact area. For that reason, it is useful to review wall dimensions as well when making the decision. If you want, you can examine this relationship in more detail in the wall thickness and section thickness design rules guide.
Conclusion
There is no single correct answer to the question of fillet or chamfer; the right answer changes according to the part’s function. If you want strength, fillet stands out; if you want easier printing and assembly guidance, chamfer stands out. In most cases, the best result comes from consciously combining these two approaches in the same part.



 Türkçe
 العربية
 Русский
 فارسی
فارسی Deutsch