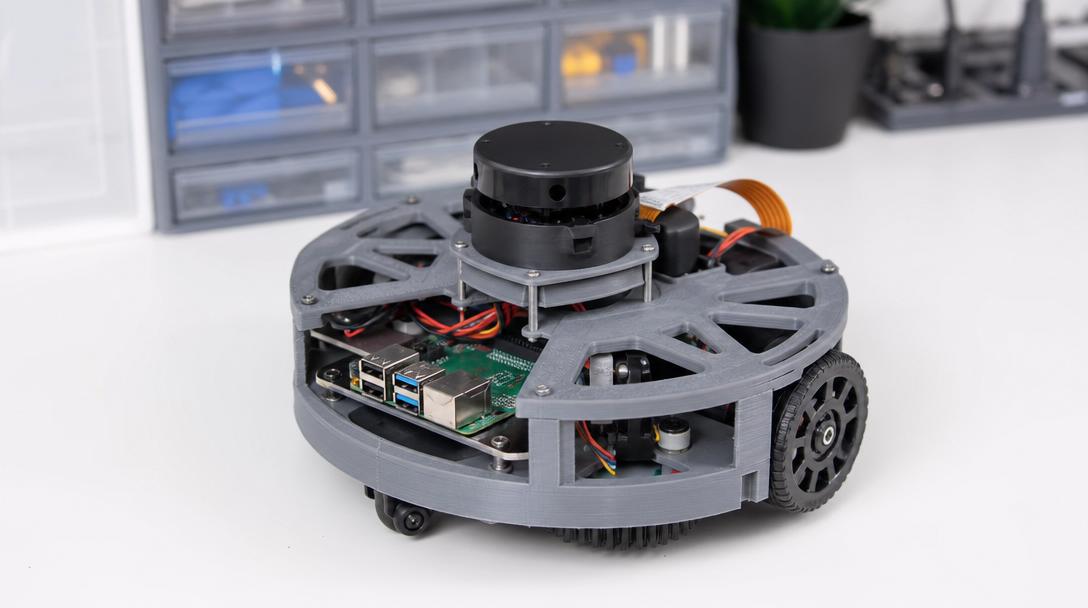
Why Prototype 3D Printing Stands Out in Open-Source Robot Vacuum Development: The oomwoo Example
Prototype 3D printing is becoming one of the most practical methods when you need to quickly test a new robotic product, catch errors early, and reproduce a part again. The open-source robot vacuum project oomwoo, announced by Maker’s Pet, shows this clearly: thanks to a 3D-printed chassis and mechanical parts, the development process can move forward module by module without being tied to closed molds.
Shared on June 14, 2026, the oomwoo project was introduced as a locally running robot vacuum platform built around Raspberry Pi, ROS 2, 2D LiDAR, and Home Assistant. The truly notable point here is that the body and many mechanical components can be produced with 3D printing. This approach offers an important advantage especially for teams that want to develop low-volume products, test electronic enclosures, and perform form-function validation before going into field testing.
Why is a 3D-printed chassis important?
In robotics projects, the first bottleneck is often not electronics but mechanical fit. Details such as sensor angle, fan housing placement, cable routing, or tolerance around the wheel may not be solved in a single revision. A 3D-printed chassis speeds up that iteration: the part is updated in CAD, printed again, and tested the same day. For startups and product teams looking for a 3d baskı hizmeti, this means very tangible time savings.
What stands out about oomwoo is that it treats the system not as a single-piece device, but as a set of developable modules. Considering sections such as the dust bin, fan unit, carrier chassis, and electronics layout separately shows how suitable 3D printing is not only for a “mock-up,” but also for real engineering iteration. If you want to develop a similar robotic housing, PCB enclosure, or mounting fixture, robotik ve otomasyon için 3D baskı çözümleri directly match these kinds of needs.
What lessons can be drawn on the FDM side?
In robotic parts like these, material selection and print orientation are critical. If layer direction is chosen incorrectly in load-bearing areas such as a chassis or mounting tab, the part may weaken earlier than expected. That is why projects like oomwoo are a good reference not only for generating ideas, but also for testing strength, serviceability, and repeatability in FDM parts at an early stage. If you want to look at the subject more technically, the guide How Does Print Orientation Affect Part Strength? is a useful place to start.
Another important point is cost control. In robotic products, seeing several different body versions before moving to injection molding often leads to better decisions. At this stage, for teams that want transparent visibility into the trial cost per part, affordable 3d printing prices and a gram-based approach become critical. If you already have a model, you can quickly estimate a preliminary cost for revised prototypes directly through the calculate your instant price link.
Why is this newsworthy?
Even though oomwoo is still at an early stage, it clearly shows the role of 3D printing in open-source robotics: repairable, improvable, and locally controlled devices instead of closed, unchangeable products. That is exactly where the value of this news lies for Ucuz3D. Because FDM 3D printing can become a real workflow for producing outer bodies, sensor carriers, fan housings, test fixtures, and low-volume functional prototypes in devices such as robot vacuums.
If you also want to turn an electronics or robotics product idea into a physical prototype quickly, starting first with a small chassis or enclosure part is often the right step.


 Türkçe
 العربية
 Русский
 فارسی
فارسی Deutsch