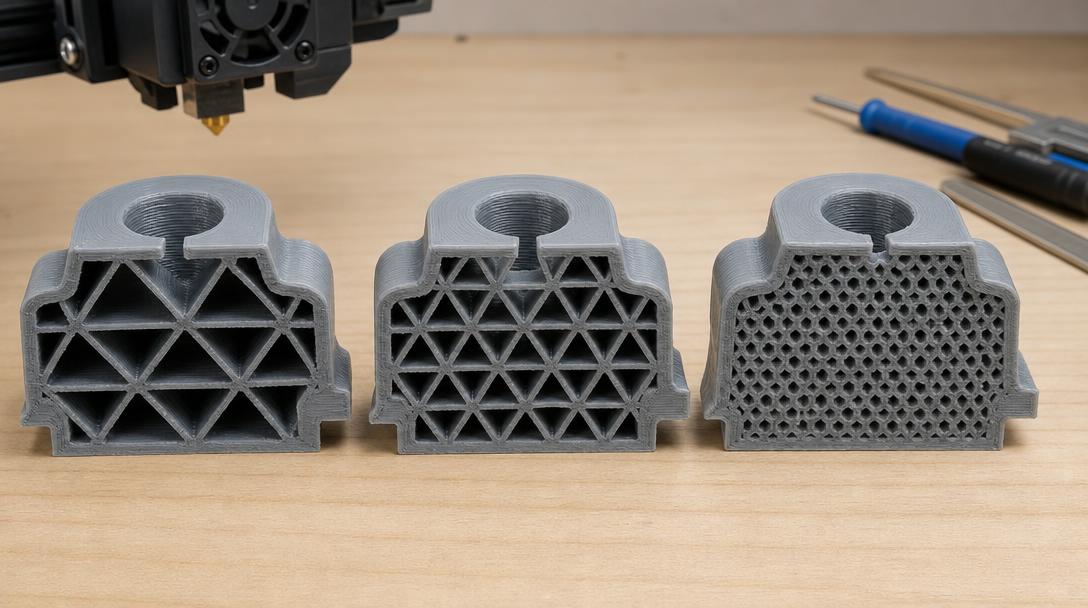
Infill Ratio Guide: 15% or 50%—What Does Your Part Need for Strength?
Infill ratio determines how densely you will fill the inside of a part in FDM printing; however, higher infill does not automatically mean the best result for every part. While 10–15% is enough for most decorative parts, the 20–35% range is generally more sensible for functional parts used in daily life; 50% and above only becomes meaningful in scenarios where the part will truly face load, impact, or clamping force.
What exactly does the infill ratio change?
As the infill percentage increases, more material is created inside the part. As a result, weight, print time, and filament consumption increase; in return, rigidity and strength in certain load directions also improve. But in practice, many users miss one important point: a part’s strength is heavily affected not only by infill, but also by wall count, layer orientation, and material choice. In other words, increasing infill to 50% may not by itself save a poorly oriented part or one with thin walls.
Especially when getting a functional 3D printing service, the goal is not the “most solid-filled part,” but a part optimized for the actual need. For the same reason, instead of simply using more filament, you should consider both the price per gram and the real usage load together.
What is the practical difference between 15%, 30%, and 50%?
- 10–15% infill: Usually sufficient for models, visual prototypes, lightweight covers, dimension checks, and display parts.
- 20–35% infill: The most balanced range for holders, boxes, simple fixtures, and most functional prototypes used in daily life.
- 40–60% infill: Preferred for parts likely to involve screwing, working under pressure, repeated loading, or impact.
- 80–100% infill: Rarely necessary; it significantly increases print time and cost, and is inefficient for most applications.
The critical point here is this: moving from 15% to 30% can create a noticeable difference in many parts, but moving from 50% to 100% does not always provide the same proportional benefit. That is why asking for a fully solid print for a broken household appliance clip, a small assembly fixture, or a low-volume spare part is often not the right approach. In such scenarios, the usage pattern is more decisive in applications such as broken plastic part production.
How should you choose the right infill for the part?
The first question is what the part is supposed to do. If the part is only meant to show shape, low infill is sufficient. For a fixture that you will squeeze by hand or that will stay fixed on a desk, a medium infill level makes sense. For a part that will carry a screw connection, be exposed to pressure, or serve a load-bearing role, higher infill may be preferred. Even so, wall thickness and print orientation should be optimized first.
The second question is the material. A part printed in PLA at 50% infill can sometimes be more brittle than a part made in PETG at 30% infill. Likewise, for a part that will work in a hot environment, increasing infill alone is not a complete solution; material selection is more important. That is why, instead of deciding based only on a percentage value, you should consider the design, material, and usage conditions together. If you want to see the topic at a more basic level with comparisons, this infill ratio guide is a good place to start.
How should you balance cost and time?
Higher infill means more material and longer print time. Especially if you will test multiple prototypes, it is more efficient to first check form and fit with lower infill instead of printing every iteration at 50% infill, and then consider the necessary increase for the final version. This approach makes both cost and delivery time easier to control. If your file is ready, getting an instant quote and comparing different scenarios also makes the decision easier.
In short, the right infill ratio is not the “highest” one, but the one best suited to the part’s function. If you are unsure, even describing the intended use in a few sentences is enough to get the right setting recommendation; this way, you can achieve a more balanced result without wasting unnecessary material.



 Türkçe
 العربية
 Русский
 فارسی
فارسی Deutsch