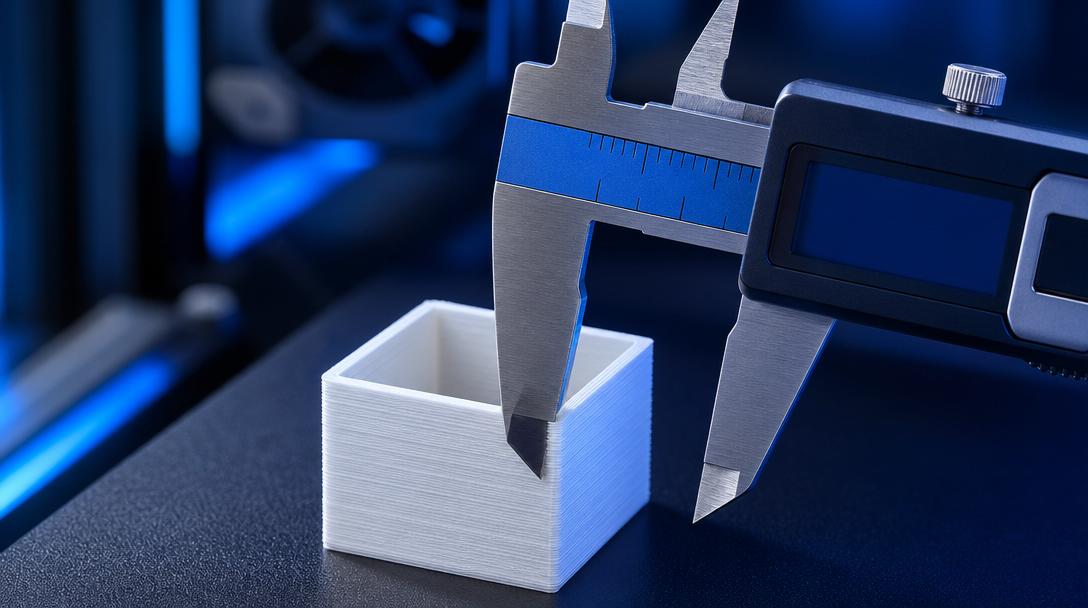
Flow Rate Calibration: Single-Wall Test Measurement
One of the most common issues encountered in 3D printing is part walls coming out thinner or thicker than intended. This problem, which can often be solved directly with flow calibration, leads to dimensional deviations, poor layer adhesion, and degraded surface quality when overlooked. Fortunately, precisely adjusting the flow rate value is simple enough to do with a single test print and a pair of calipers. In this article, we explain flow rate calibration step by step and show how proper flow adjustment contributes to your print quality.
What Is Flow Rate and Why Does It Matter?
Flow rate is the percentage expression of the amount of filament the slicer commands to be extruded through the nozzle. The default value is 100% in most slicers, but not every printer and filament combination has the same flow characteristics. An improperly set flow rate causes the following issues:
- Under-extrusion (low flow): Walls are thin, weak, and have gaps between them; the part breaks easily.
- Over-extrusion (high flow): Walls bulge, dimensions are off, the surface becomes rough, and buildup at the nozzle increases.
For this reason, flow rate calibration is an essential step, especially for parts requiring mechanical tolerances or interlocking designs. A professional 3D printing service also optimizes flow parameters for each batch based on the material to achieve consistent results.
Step-by-Step Calibration with the Single-Wall Test
The most reliable method for flow rate calibration is to print a single-walled test cube and measure the wall thickness with calipers. Here are the steps:
1. Prepare the Test Model
Create a simple cube measuring 20×20×20 mm in your slicer. Set the wall count (perimeters) to 1 and the number of top and bottom layers to 0. Set the infill to 0%. With these settings, you obtain a test piece consisting of only a single outer wall.
2. Print the Reference Piece
Print the model at the default 100% flow rate. Once the print is finished, measure the wall thickness with calipers from at least three different points and calculate the average. Note this value down.
3. Compare the Wall Thickness with the Nozzle Diameter
If you are using a 0.4 mm nozzle, the thickness of a single-walled print should theoretically be 0.4 mm. If your measurement comes out as, for example, 0.36 mm, that means under-extrusion; if it comes out as 0.44 mm, that means over-extrusion. The corrected flow rate is calculated with the following formula: (Nozzle Diameter ÷ Measured Wall Thickness) × 100. Example: (0.40 ÷ 0.44) × 100 = 91%. Save this value to your slicer profile.
The Effect of Proper Flow Rate on Your Prints
Once flow rate calibration is complete, you will notice the difference on your very first print. Walls now come out at the expected thickness, the part surface is cleaner, and your interlocking parts stay within tolerance. We recommend repeating the calibration not only when changing printers but also when switching filament brands or types, because each filament has a different melt flow characteristic. For more detailed troubleshooting related to flow adjustment, you can also check out our guide on gaps and under-extrusion issues in printing.
The Difference Between Flow Rate and E-Step Calibration
A common confusion is thinking that flow rate and e-step (extruder step) calibration are the same thing. However, these two settings work at different levels:
- E-Step calibration: Checks whether the extruder gear is physically feeding the correct amount of filament. It is done once and is specific to the printer.
- Flow rate: Determines, at the slicer level, how the software interprets the amount of filament being fed. It may vary depending on the filament and the model.
For the most accurate results, e-step calibration should be performed first, followed by flow rate calibration. If you skip this order, one adjustment can mask the error of the other, and you may end up dealing with inconsistent results.
Flow rate calibration is one of the cornerstones of quality in 3D printing. With a pair of calipers and a ten-minute test print, you can significantly improve the dimensional accuracy of your parts. If you would like to achieve the best results for your projects as well, upload your design and get an instant price quote, and have high-quality parts produced with print parameters optimized by our experienced team.


 Türkçe
 العربية
 Русский
 فارسی
فارسی Deutsch