Wall Count and Infill Pattern Matching in FDM Printing: The Dual Formula for Strength
Wall count in FDM printing is a parameter most users overlook, yet it determines part strength even more than infill density does. Validation tests carried out recently in industrial FDM applications show that the match between wall count and infill pattern can create a difference of up to 40 percent in a part’s final strength. In this article we explain step by step how many walls and which infill pattern you should use in each situation.
Why Is Wall Count More Critical Than Infill Density?
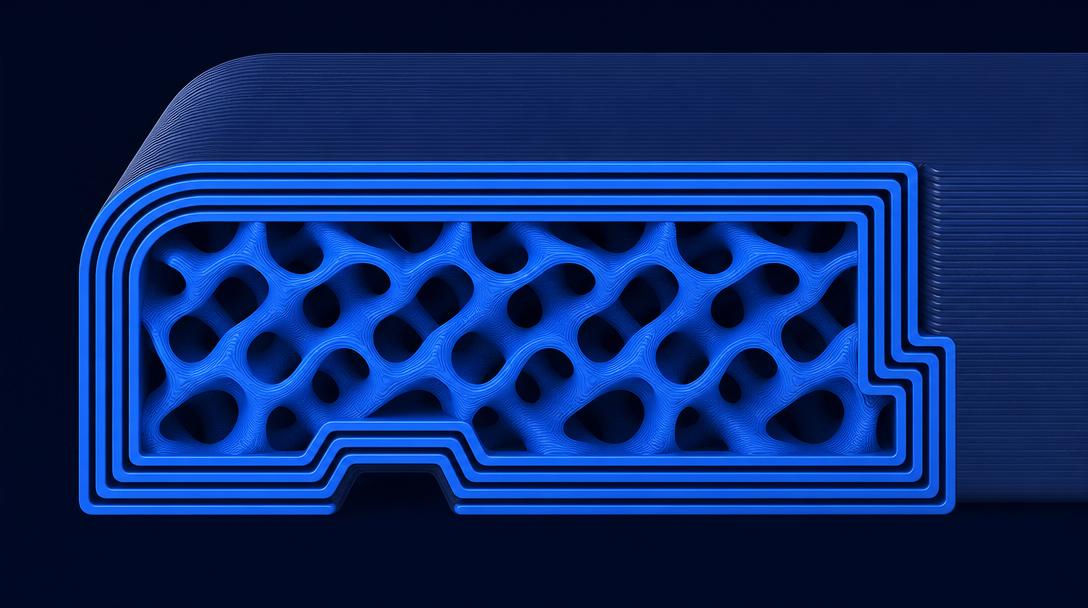
The outer shell of an FDM part carries the bulk of its load-bearing capacity. No matter how dense the inner infill is, if the wall count is insufficient the part can suffer layer separation even under low forces. Especially at screw holes, clips and points exposed to pressure, using 3 or 4 perimeters delivers more benefit than raising the infill density to 40 percent. This is exactly why prioritizing wall count over infill is becoming increasingly common in industrial prototyping and functional part production. Whether you are ordering an FDM printing service or producing on your own machine, setting the wall count according to the part’s intended use is the smartest starting point.
Infill Patterns: Not Every Pattern Suits Every Job
Slicer software offers dozens of infill pattern options. We can group them into three main categories:
- Linear patterns such as Grid and Rectilinear: They print quickly but carry load along a single axis; at low infill (below 20%) they may not be enough.
- 3D patterns such as Gyroid and Honeycomb: They distribute load in multiple directions and give the best strength-to-weight ratio. Gyroid is especially superior under impact loads.
- Isotropic patterns such as Tri-Hexagon and Cubic: They are ideal for parts that need equal strength in every direction; print time is slightly longer.
When choosing, you must consider in which direction your part will be subjected to force. For a part under a single-direction load the difference between gyroid and grid can be negligible, whereas for connecting elements exposed to multidirectional forces gyroid clearly gives better results.
How Do Walls and Infill Work Together?
To find the ideal combination you need to proceed according to the part’s intended use. While 2 walls + 15% gyroid is enough for a decorative model, a functional part such as a drone landing gear delivers far more reliable results with 4 walls + 30% gyroid. One important detail: when you increase the wall count, the infill pattern’s load transfer also changes, because the contact surface between the inner infill and the outer shell widens. This interaction is especially noticeable in printing with engineering materials. With materials such as carbon fiber reinforced filament or nylon, setting the wall-to-infill match correctly lets you use the part’s full theoretical strength.
Which Combination for Which Scenario?
- Prototype and visual model: 2 walls + 10-15% gyroid — fast, economical, sufficient.
- Everyday use and light load: 3 walls + 20% gyroid — balanced and reliable.
- Mechanical part and connecting element: 4 walls + 30-40% gyroid or cubic — maximum strength.
- High temperature or impact zone: Engineering material + 4+ walls + 40% gyroid — the most robust configuration.
These thresholds apply across a wide range, from standard filaments such as PLA and PETG to engineering materials such as nylon and polycarbonate. To see the difference you can run a test on your own part or consult a professional directly. At Ucuz3D, with our 17 different material options, we determine the most suitable wall-to-infill combination for your project and let you see your budget instantly with our instant price calculator tool. You can explore the strength level you need on our printing with engineering materials page, and if you wish, get more detailed information on the topic from our infill ratio guide.
If you are not sure which wall count and infill pattern is right for your project, send us your design. We determine the most suitable production parameters for your needs and offer you a tailored solution.




 Türkçe
 العربية
 Русский
 فارسی
فارسی Deutsch