Using PrusaSlicer Modifier Mesh to Add More Infill to a Specific Area in PrusaSlicer
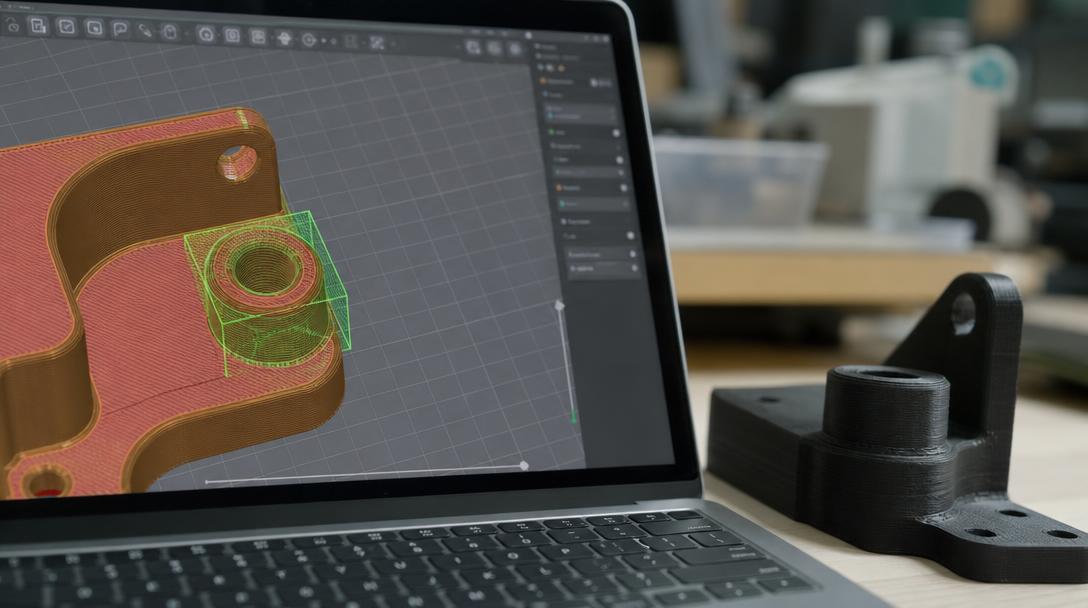
PrusaSlicer modifier mesh is used to reinforce only the area that needs it, without making the entire part heavier. Increasing local infill and walls at points such as a screw seat, hinge base, clip foot, or an impact-prone corner is a much more efficient solution in FDM printing.
When many users encounter a strength problem, they think about reprinting the entire model with 50% infill. However, most breakages occur not throughout the whole part, but at specific stress points. This is exactly where the modifier mesh logic comes in: you reinforce only the load-bearing area without making the entire print heavier. This approach keeps both print time and filament consumption under control.
What exactly does modifier mesh do?
Modifier mesh allows you to assign different print settings to a specific volume of the model. In other words, while the main body is printed with 3 walls and low infill, only the critical area can be printed with 5 walls, denser infill, or different top-bottom layer settings. Especially before having a functional part produced through a 3d printing service, understanding this logic helps you make smart reinforcements instead of unnecessary thickening.
Which areas is it most useful for?
- Around screw holes and insert seats
- Hinge connections
- Snap-fit clip feet
- Thin base corners that contact the build plate
- Connection tabs exposed to impact
For example, in a broken lid foot, a small electronics enclosure, or a reproduced household appliance part, the main issue is usually not the entire body, but the connection point. That is why modifier mesh is a very sensible tool, especially in broken plastic part 3D printing scenarios.
How is it applied in PrusaSlicer?
- Place the main model on the build plate.
- Right-click the model and open the Add modifier option.
- Select a cube, cylinder, or custom volume and place it over the area you want to reinforce.
- Scale the modifier object and adjust it so that it covers only the critical area.
- Define separate settings for this modifier, such as higher infill, more perimeters, or thicker top-bottom layers.
The most common mistake is leaving the modifier volume larger than necessary. When that happens, the advantage is lost; the part becomes heavy again and print time increases. The goal should be to cover only the area where the load is concentrated.
When should you increase infill, and when should you increase walls?
If there is tension and bending in an area, increasing the number of walls is often more effective than simply raising the infill. If there is a risk of crushing or cracking around a screw seat, both the perimeter and the local infill can be increased together. The orientation of the part also seriously affects the result; for this reason, when making a reinforcement decision, it is also necessary to consider the logic in the guide How Does Print Orientation Affect Part Strength?.
Is it always necessary?
No. In visual prototypes, mock-ups, or presentation parts that do not carry loads, modifier mesh is often unnecessary. But it becomes very valuable in parts intended for functional use, frequent assembly-disassembly, screw connections, or light impact. Also, instead of printing the entire model more densely than necessary, reinforcing only the critical area gives a more balanced result in terms of affordable 3D printing prices.
In short, modifier mesh replaces the “too much material everywhere” approach in FDM printing with the “smart reinforcement where needed” approach. If you are looking for the right balance between print time, cost, and durability for a functional part, planning this technique can make a big difference even before you upload your file and see the instant price.



 Türkçe
 العربية
 Русский
 فارسی
فارسی Deutsch